Comment on page
Creating a new application
These credentials are provided to you by the Purchasely Team. If you want to have your credentials created, just contact us at [email protected]
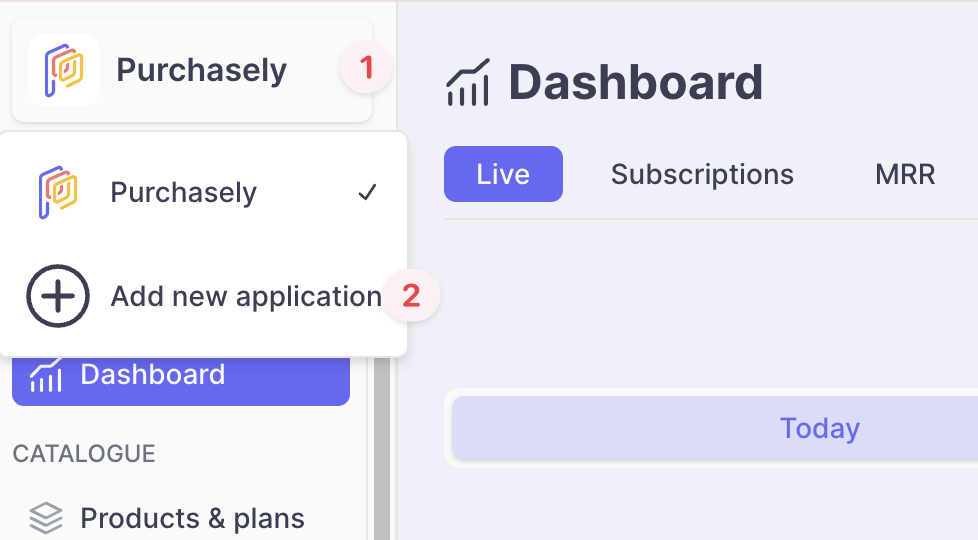
To create a new app, click on the
Add new application
in the drop-down menu in the top-left corner
If you have 2 different environments (e.g.: staging & production), you should create 2 different Applications in the Purchasely Console and use 2 different API keys
We advise you to start creating a staging application first (i.e. a mobile application plugged into a staging environment) to perform your first tests.
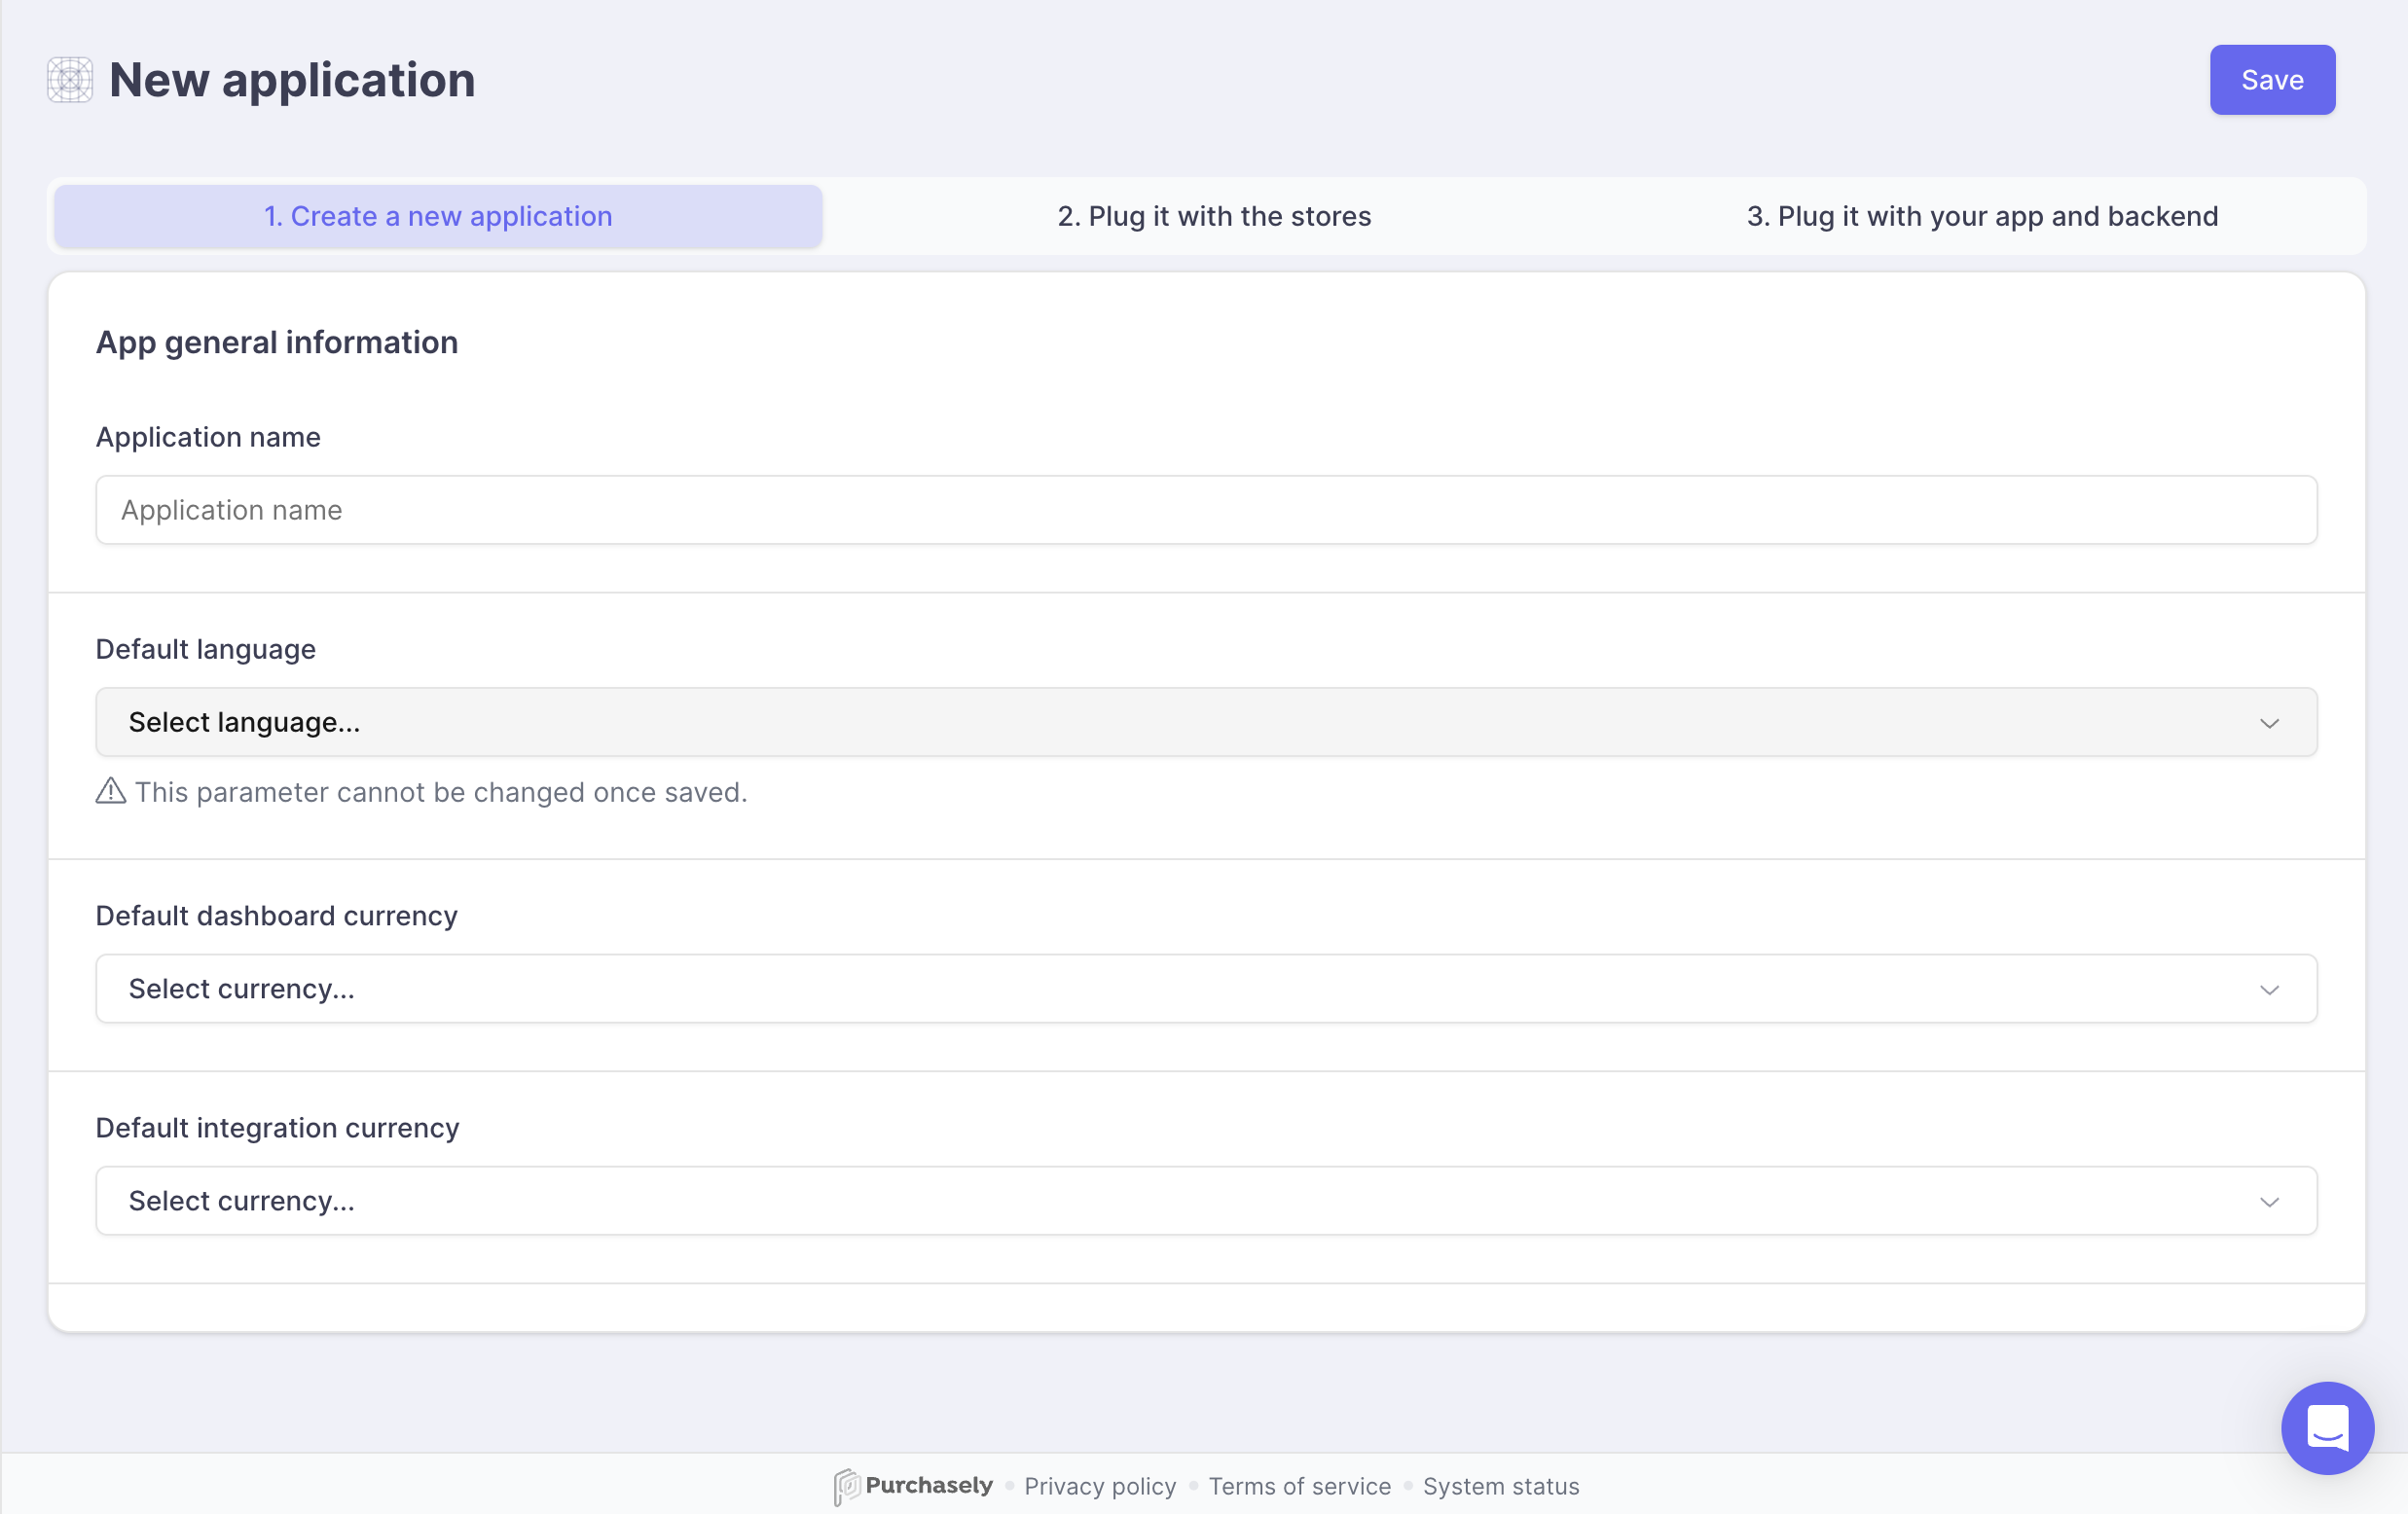
This new application must be configured with a set of parameters among 3 different stages. All these parameters can be modified after the application has been created.

The mandatory parameters are :
- Name: the name of the application as it will be displayed in the Purchasely Console.
- The default language: this will define which language shall be used when the language on a user device is not supported by the application; ⚠️ This value can't be changed later.
- Default Dashboard Currency: this is the currency unit displayed in your Purchasely Dashboards.
- Default Integration Currency: this currency unit is used to send price information to the Webhook and 3rd party integrations

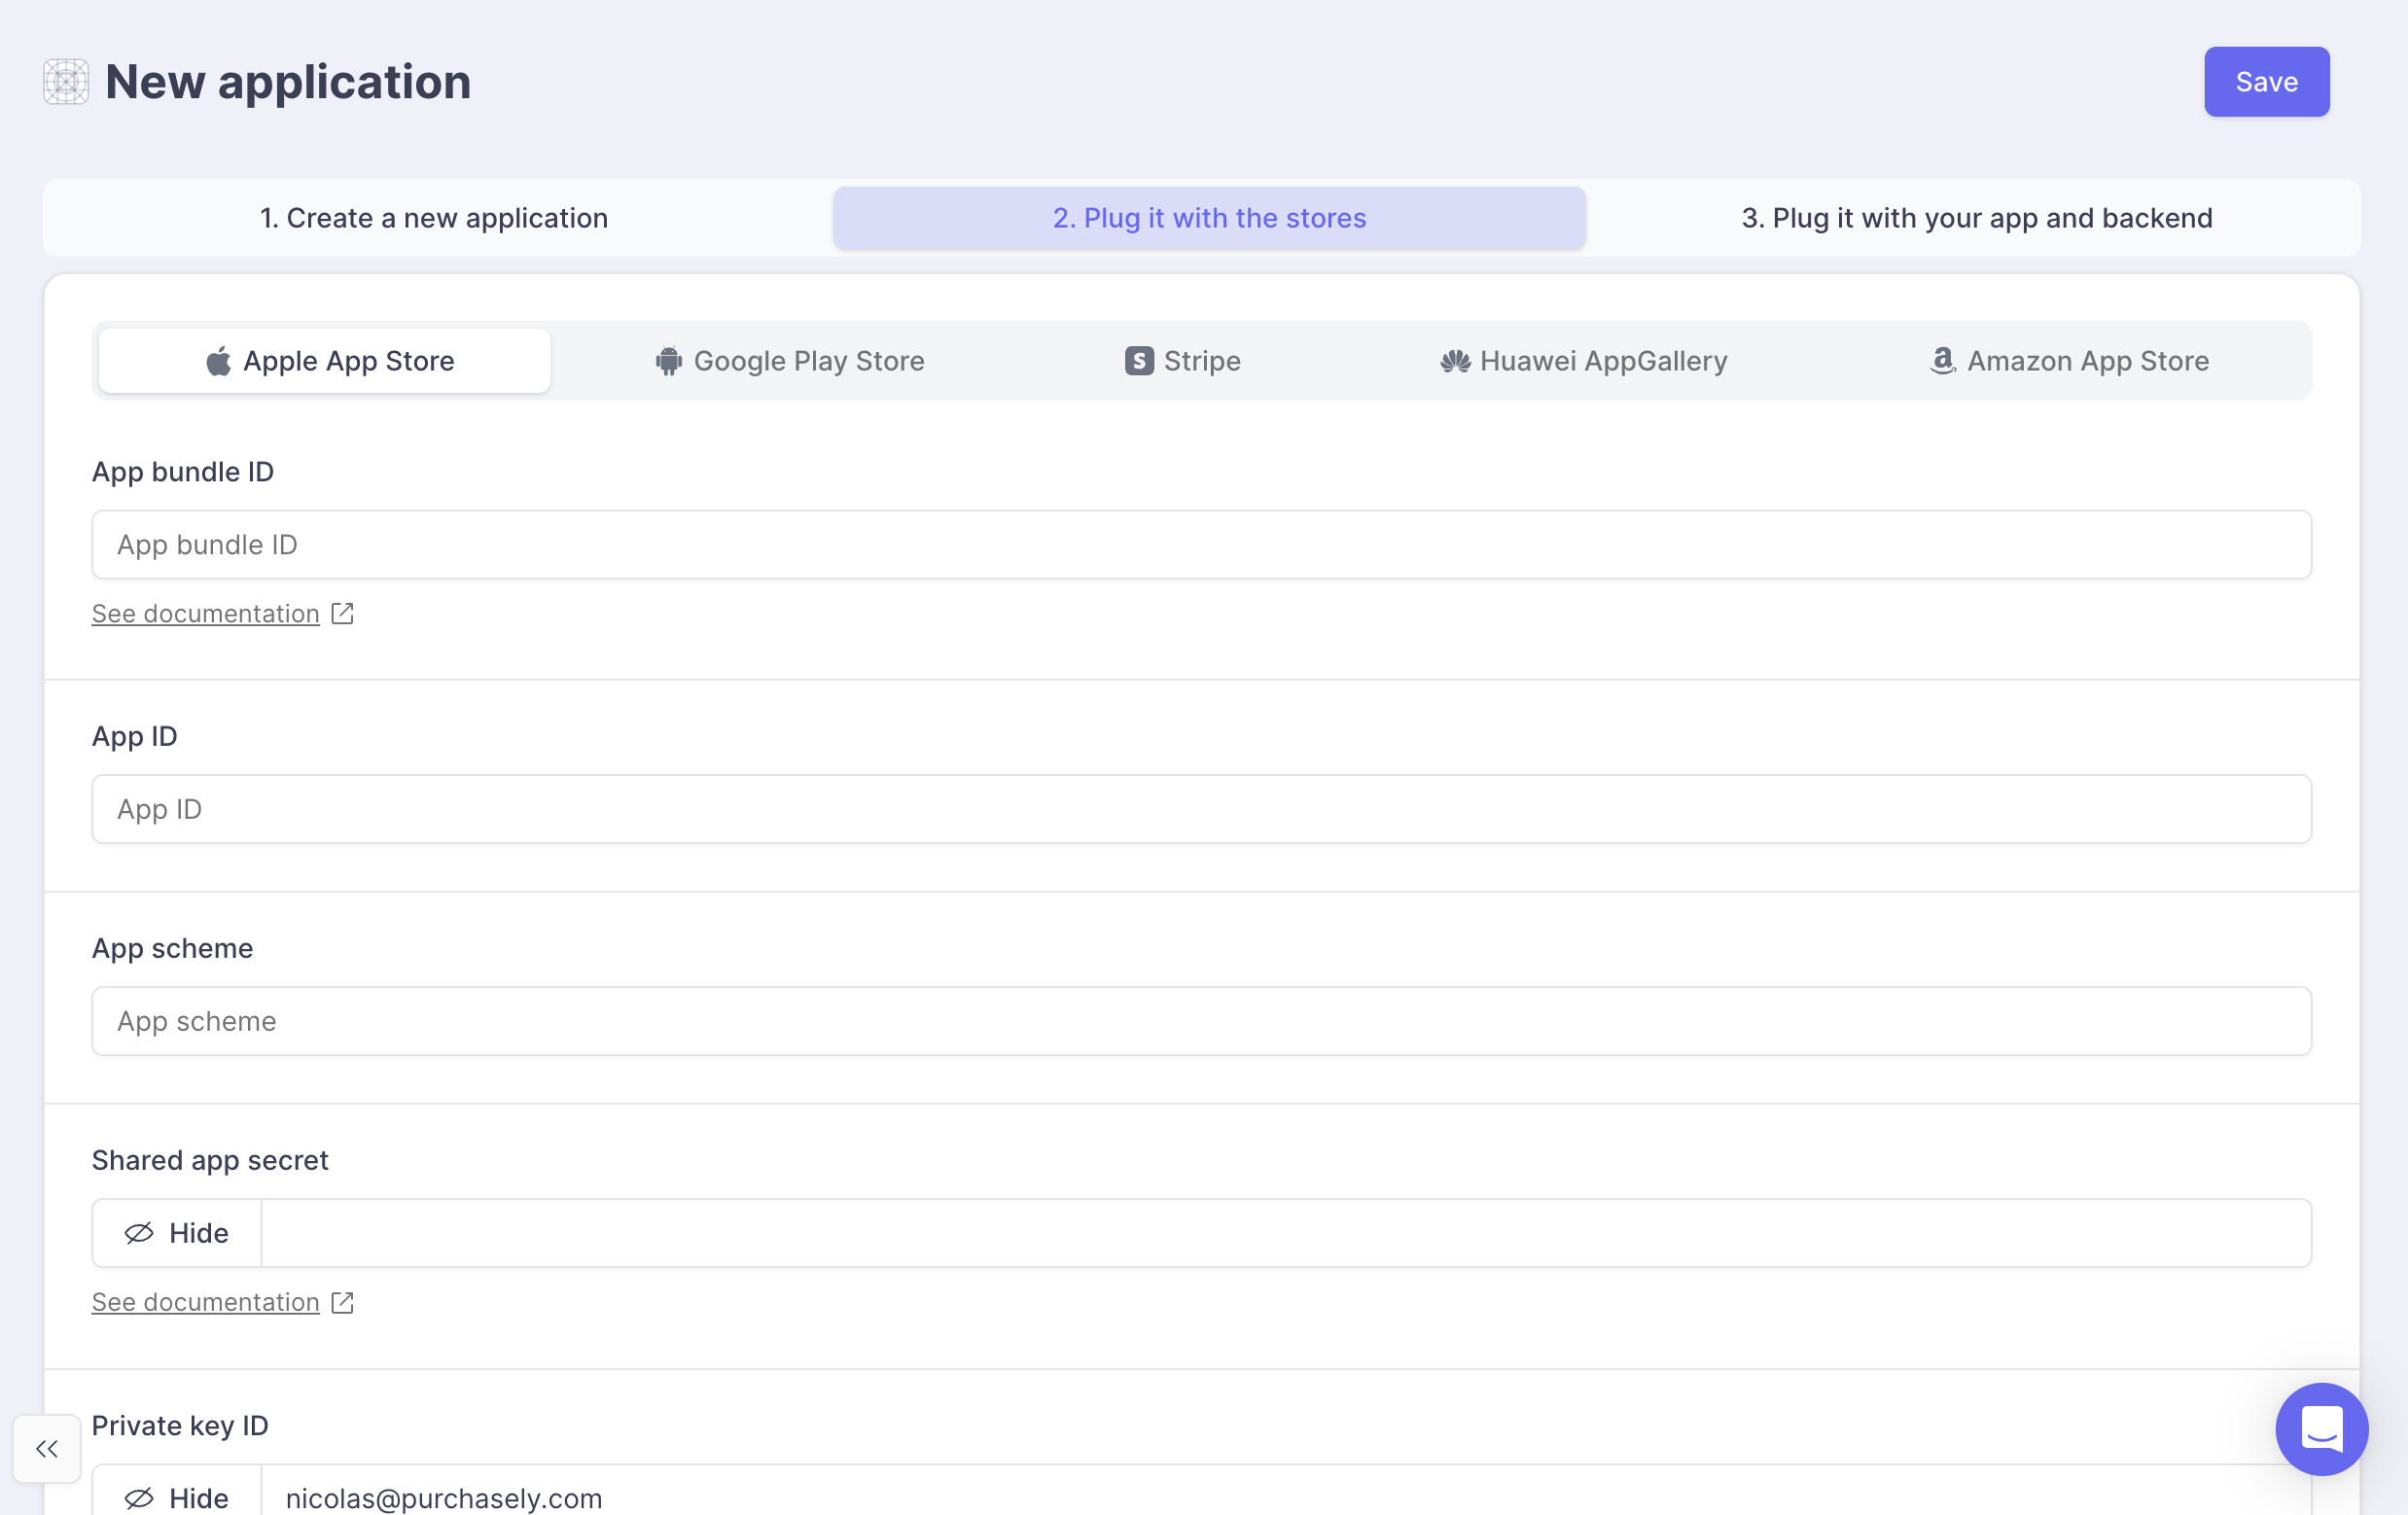
You can add up to 4 different stores. Step by step configuration of each store is explained below, in dedicated sections.

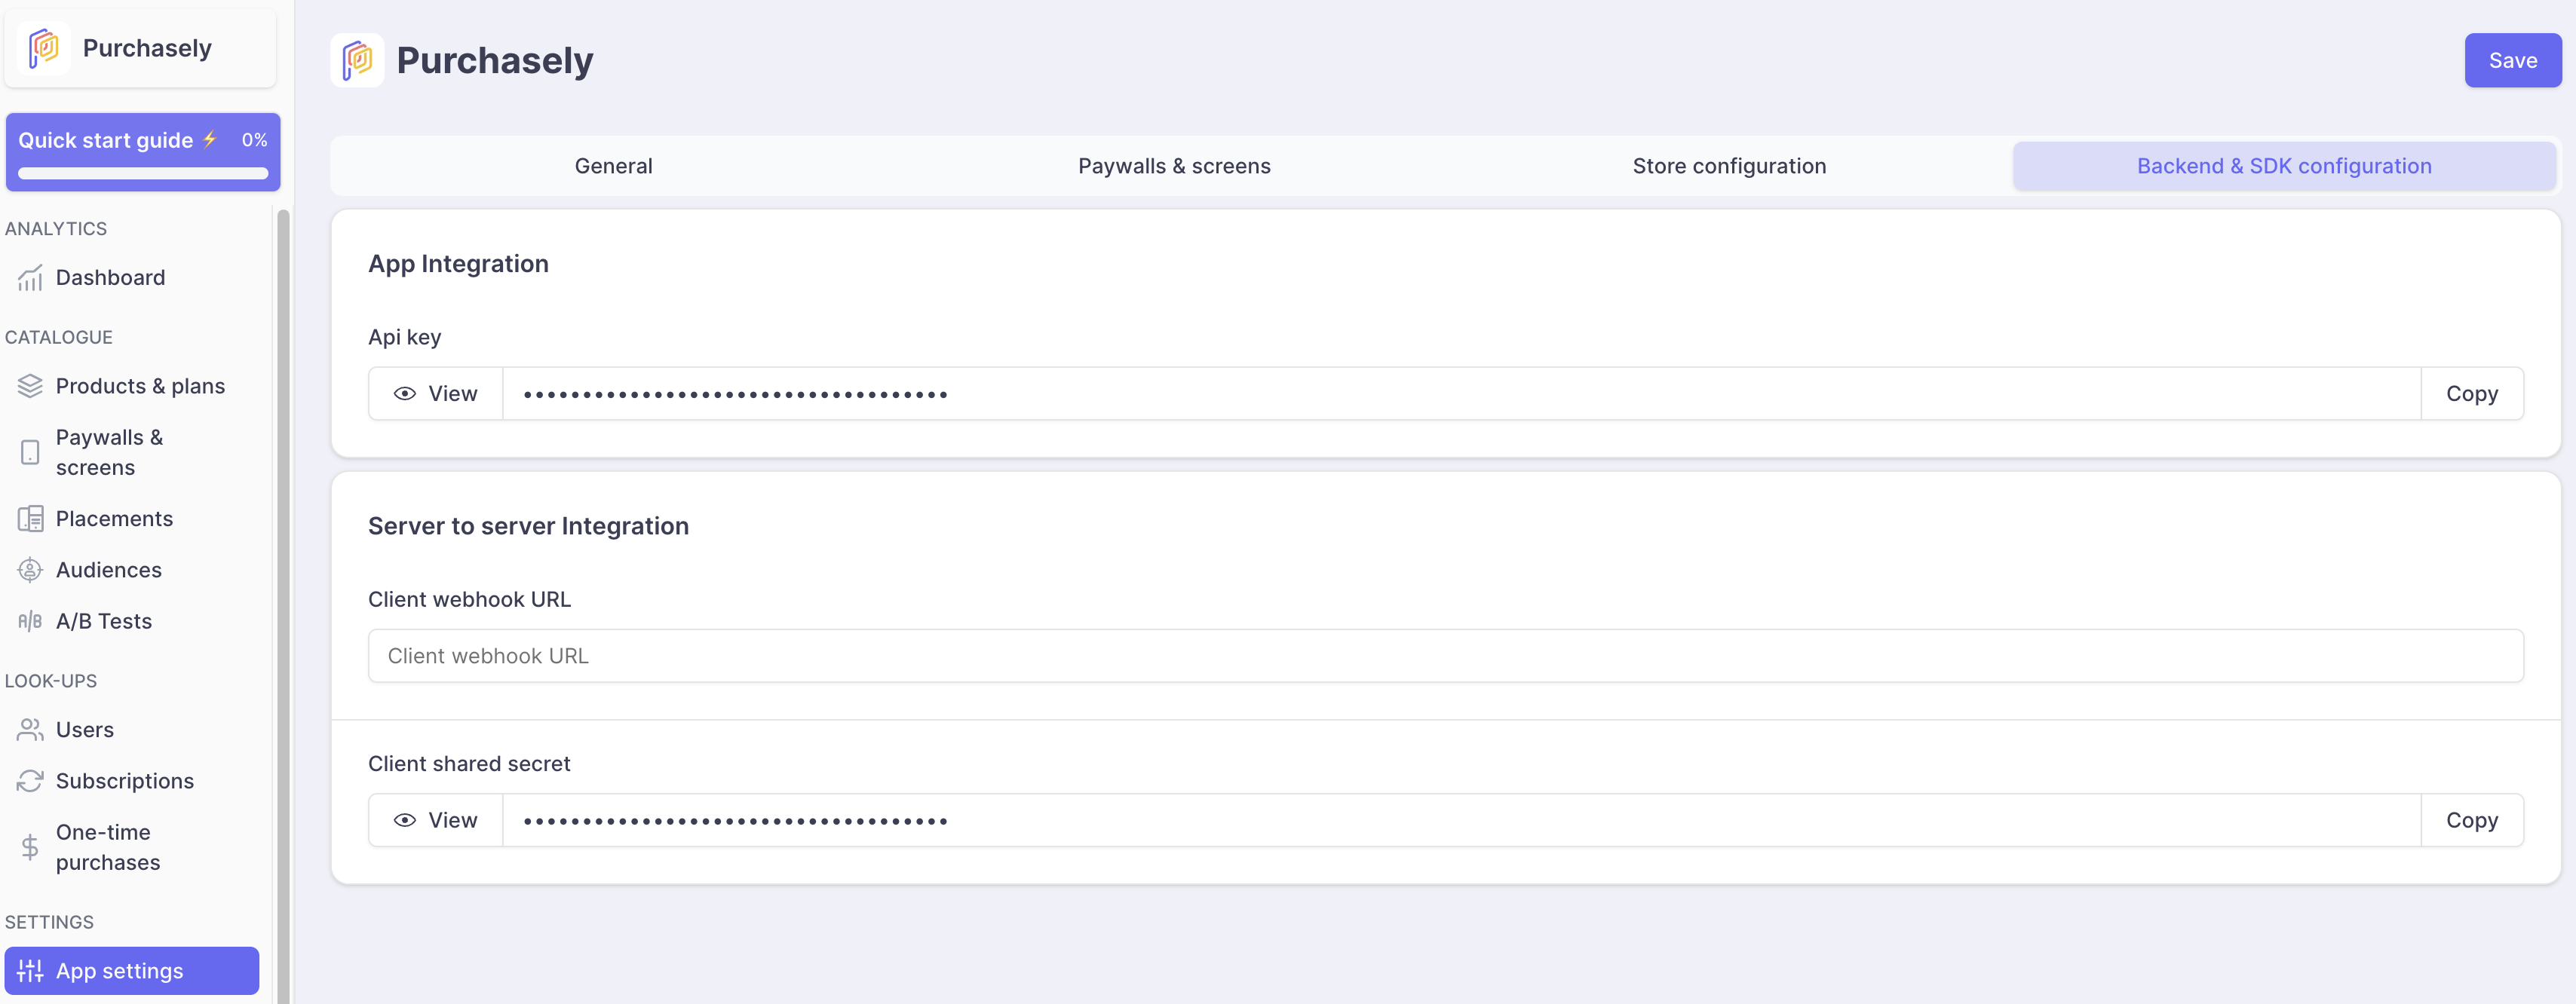
In this section, you can plug the Purchasely Cloud Platform with your own backend through server-to-server integration. This will allow having your backend notified through a webhook when a transaction event is received from the stores.

Purchasely webhook illustration
Fill in the
Client webhook URL
with the endpoint URL on your own backend where you want to receive the subscription events.If your
Client Webhook
is not ready when you make your configuration, we advise you to use the following value: https://httpstat.us/200This value will simulate a HTTP 200 response code allowing the Purchasely Cloud Platform to consider that the new subscription has been duly acknowledged by the Client Backend.
Every message send by Purchasely in the webhook is signed using a Client shared secret.
In order to connect your Apple App Store account with Purchasely, you have to provide the following parameters from the Apple App Store
- 1.
- 2.
- 3.

Apple App Store Plug-in with Purchasely
The Bundle ID is used by Purchasely Cloud Platform to validate that receipts are indeed coming from your app
App Store:
Get the value of the
Bundle ID
field in App Store Connect
App Store Connect > My Apps > [YOUR APP] > General > App InformationPurchasely Console:
The value of the
Bundle ID
should be reported in the field App Package in the Purchasely Console
Purchasely > [YOUR APPLICATION] > Settings > App Settings > Store Configuration > Apple App Store
Bundle ID and Apple ID
It is required for promo code deeplinks in the paywalls.
App Store:
Get the value of the
Apple ID
field in App Store Connect
App Store Connect > My Apps > [YOUR APP] > General > App InformationPurchasely Console:
The value of the
Apple ID
should be reported in the field App Package in the Purchasely Console
Purchasely > [YOUR APPLICATION] > Settings > App Settings > Store Configuration > Apple App StoreYou can define the app scheme of your mobile application refer to these documents for instructions to do the same for iOS apps. It is a required value in order to use the paywall preview feature in Purchasely Console.
The Shared App Secret is used by Purchasely Cloud Platform and required to validate receipts for this specific app

App Store:
Get the value of the
Apple ID
field in App Store Connect
App Store Connect > My Apps > [YOUR APP] > Subscriptions > App-Specific Shared Secret > ManagePurchasely Console:
The value of the
App-Specific Shared Secret
should be reported in the field App Package in the Purchasely Console
Purchasely > [YOUR APPLICATION] > Settings > App Settings > Store Configuration > Apple App StoreBy default Purchasely SDK uses Store Kit 2, you need to grant us a specific access to your In-App Purchases for our service to work
Please follow this guide to configure Store Kit 2 with Purchasely
You can use Store Kit 1 if you want, just skip this step and make sure that Purchasely.start() is configured with Store Kit 1
The last field Server-to-server endpoint is not mandatory. It is used to activate the real-time server-to-server notifications coming from the App Store.
In order to connect your Google Play Console account with Purchasely, you have to provide the following parameters from the Google Play Console
- 2.
- 3.

Google Play Console Plug-in with Purchasely
The Bundle ID is used by Purchasely Backend to validate that receipts are indeed coming from your app

The value of the Package ID should be reported in the field
App bundle id
in your Purchasely consoleGoogle Play Console :
Get the value of the Package ID of your App in Googe Play Console
Google Play Console > All Apps > [YOUR APP]
Purchasely Console:
The value of the
Apple ID
should be reported in the field App Package in the Purchasely Console
Purchasely > [YOUR APPLICATION] > Settings > App Settings > Store Configuration > Play StoreYou can define the app scheme of your mobile application refer to these documents for instructions to do the same for Android apps. It is a required value in order to use the paywall preview feature in Purchasely Console.
This access key is mandatory to allow Purchasely Cloud Platform to decode Play Store receipts/token
This task involves three steps
You will need to enable 2 APIs on Google Cloud Console
- 1.
- 2.
- 3.
Create a dedicated Service Account under Google Cloud Platform Console
Google Cloud Platform > IAM & admin > Service Account > Create a new Service Account
Before creating the service account, make sure that the relevant Project is selected. The drop-down menu in the upper left corner of the screen shall match the Organisation you have set in the previous step
- Name your account
Purchasely
to be able to easily identify it later - Give it the ID
purchasely
- On the following screen, set the role to "Owner"
- You can also set "Pub/Sub Admin" and "Monitoring Viewer" as roles instead of "Owner"
- On the following screen, note the email generated by Google for your Service Account
- It should look like
[email protected]
- Create a key by clicking on the
+ Create a key
button - Choose JSON format to download the file
- Fill the content of the field "Access key" with this JSON file
Grant access to the Service Account under the Google Play Console
Google Play Console> Users & Permissions > Invite new users

You will need to complete those 3 steps:
- 1.Set the email of your service account
- 2.Set "no expiration date"
- 3.Add your application
Tab: App permissions - Select the application corresponding to the app bundle id

Service Account permission in Google Play Console
Once you have clicked on Apply - Ensure the following permissions are selected :
- View app information and download bulk reports
- View financial data, orders, and cancellation survey responses
- Manage orders and subscriptions

Finally, click on Invite user to grant access to your service account

We connect to Google Cloud Pub/Sub automatically for you by using your service account access. All you need to do is click on "Connect to Google" and follow the steps

Connect to Google from Purchasely

The Package name is used by Purchasely Cloud Platform to validate the authenticity of the receipts.
- 1.
- 2.
- 3.Get the value of the
Package name

The value of the Package name should be reported in the field Huawei
App package id
in your Purchasely consoleThe App ID is used by Purchasely Cloud Platform to validate the authenticity of the receipts.
Same procedure as "App Package Id", with the
App ID
property which must be put under App id
in the Purchasely Console (Purchasely > Mobile Applications > [YOUR APPLICATION] > Huawei configuration)
The App secret is used by Purchasely Cloud Platform to validate the authenticity of the receipts.
Same procedure as "App Package Id", with the
App secret
property which must be put under App secret
in the Purchasely Console (Purchasely > Mobile Applications > [YOUR APPLICATION] > Huawei configuration)
The public key is used by Purchasely Cloud Platform to validate the authenticity of the receipts.
- 1.
- 2.
- 3.In the "All services" menu on top, search for "In-App Purchases" and click on it
- 4.Get the
Public key
property

- 1.Fill in this value under
"In-App Purchases" public key
in the Purchasely Console (Purchasely > Mobile Applications > [YOUR APPLICATION] > Huawei configuration)

The Package name is used by Purchasely Cloud Platform to validate the authenticity of the receipts.
- 1.
- 2.Select App List
- 3.Select your app
- 4.Get the value of the
App SKU

The value of the
App SKU
should be reported in the field Amazon App SKU
in your Purchasely console.Last modified 1mo ago