

Tags
This section provides details about the Price Tags available in the Screen & Paywall Builder
What are tag used for?
Purchasely has a tagging system to fetch information about the price and duration of subscriptions and one-time purchases, as well as the Introductory Offer (for user acquisition) and Promotional Offer (winback/retention) prices and durations.
Thanks to these tags, you don't have to hard code price for each and every stores in your screens and paywalls.
Using these tags will also ease to make your paywall compliant with the App Store Guidelines.
You should be transparent about the plan price in your Paywalls. If you have any introductory offer or promotional offer, you should mention how much the user will pay after the offer ended.
Where can you use tags?
Tags can be used in any label on a Screen. You can add them by simply clicking on the {{TAGS}} inside the text field.
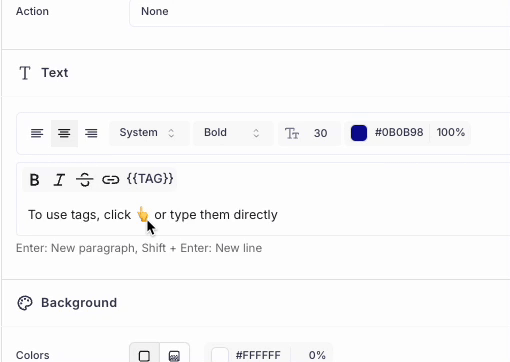
You can also directly type them in plain text. To do so, put the name of the tag between 2 pairs of curly brackets. Eg: {{PRICE}}
What are the options when using tags?
You can use 2 types of tags.
-
Tags with no parameters refer to the Plan directly mapped with the parent element (eg: the picker to which the text belongs or the purchase button) or to the default Plan configured for this Screen.
=> This way, if you change the Plan associated with the button / picker (or run an Price A/B test), you won't need to update the tag.
-
Tags with parameters are mapped with a specific Plan. They appear with the reference of the Plan selected between brackets. If you want to use them, simply select the desired Plan in the widget.
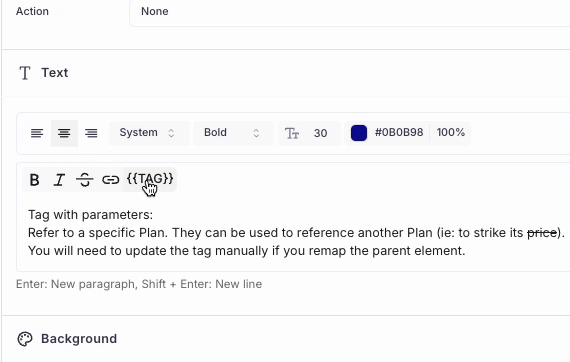
They can be used to reference another Plan in a picker or button than the one which it is mapped with, or to associate a Plan which is not the default one.
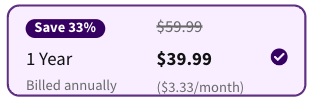
The strikethrough price is a reference to another Plan than the one associated with the picker
Why does the preview display a$XX.XXinstead of the actual price?In some cases, tags cannot be displayed properly in the preview of the Console. They are replaced by XX.XX
The reason is that the Purchasely Console is not directly interfaced with the App stores. Therefore, it can only know the price of a SKUs in each territory once a transaction has been processed or observed by the Platform.
As soon as it is the case, the XX.XX will be replace by the actual price in the appropriate currency. Eg: $9.99
Be reassured however, the SDK fetches the information directly from the App stores, and therefore always displays the correct price, in the appropriate currency (the one from the user's App store territory).
Types of tags
General tags:
These tags are most common tags that used in all the paywalls.
| Tag | Usage | Example |
|---|---|---|
PRICE | Full price with period (e.g., $9.99/month) | "Subscription will be renewed at {{PRICE}}" |
AMOUNT | Price without period (e.g., $9.99) | "Your lifetime plan costs {{AMOUNT}}" |
PERIOD | Billing period unit (e.g., month, year) | Billed every {{PERIOD}} |
DURATION | Total duration (e.g., 1 month, 1 year). | Access for {{DURATION}} |
Duration tags
These tags help you display the subscription duration in days, weeks , months and etc.
| Name | Usage | Example |
|---|---|---|
DAYS_DURATION | Duration in days | For a renewing plan:
|
WEEKS_DURATION | Duration in weeks | For a renewing plan:
|
MONTHS_DURATION | Duration in months | For a renewing plan:
|
QUARTERS_DURATION | Duration in quarters | For a renewing plan: The output will be: |
YEARS_DURATION | Duration in years. If the subscription is less than a year, the output will be 0. | For a renewing plan: The output will be: |
Subscription cost per duration tags
Perfect for showing equivalent cost breakdowns, useful when comparing plans.
| Name | Usage | Example |
|---|---|---|
DAILY_AMOUNT | Cost per day | For a renewing plan:
|
WEEKLY_AMOUNT | Cost per week | For a renewing plan: The output will be: |
MONTHLY_AMOUNT | Cost per month | For a renewing plan:
|
QUARTERLY_AMOUNT | Cost per quarter | For a renewing plan: The output will be: |
YEARLY_AMOUNT | Cost per year | For a renewing plan:
|
OFFER_DAILY_AMOUNT | Displays the cost of the Introductory Offer or Promotional Offer of a Plan per day. | For a renewing plan:
|
OFFER_WEEKLY_AMOUNT | Displays the cost of the Introductory Offer or Promotional Offer of a Plan per week. | For a renewing plan: The output will be: |
OFFER_MONTHLY_AMOUNT | Displays the cost of the Introductory Offer or Promotional Offer of a Plan per month. | For a renewing plan:
|
OFFER_QUARTERLY_AMOUNT | Displays the cost of the Introductory Offer or Promotional Offer of a Plan per quarter. | For a renewing plan: The output will be: |
OFFER_YEARLY_AMOUNT | Displays the cost of the Introductory Offer or Promotional Offer of a Plan per year. | For a renewing plan:
|
Price & Percentage comparison tags
These tags comes handy for your to calculate percentage difference and the price difference between 2 different plans and show them automatically in the respective currency.
| Name | Usage | Example |
|---|---|---|
PERCENTAGE_COMPARISON | Compares the first plan against the second one | With:
|
DISCOUNT_PERCENTAGE | Discount % between two plans. The first plan is the one being described. The second is the one to compare it with. The order in which the plans are selected matters. | With:
|
RAISE_PERCENTAGE | % increase between plans. The order in which the plans are selected does not matter. | With:
|
PRICE_COMPARISON | Raw price difference. The price difference is computed with the periodicity of the first plan selected. | With:
|
Offer tags
These tags can be used to display the price and duration of the both introductory/new user acquisition offers and Winback/retention offers you have created in the stores and declared in the Purchasely console.
| Tag | Usage | Example |
|---|---|---|
OFFER_PRICE | Offer price with period | For a winback offer :
|
OFFER_AMOUNT | Offer price without period (e.g., $9.99). | For a winback offer :
|
OFFER_PERIOD | Billing period during offer | For an extension of a free trial:
|
OFFER_DURATION | Total offer length | For a winback:
|
OFFER_PRICE_COMPARISON | Displays the price difference between the discounted offer and the regular price of the plan for the higher duration. | With:
|
OFFER_DISCOUNT_PERCENTAGE | % discount of an Offer price vs Full price.
| With:
|
Countdown tag
These set of tags are very useful to create dynamic countdowns. You can integrate them in any label of your Screen. 3 different types of Timers are offered:
Timers are not only a simple tag but rather a set of tags composed of different sub-tags (TIMER(MONTHS), TIMER(DAYS), TIMER(MINUTES), TIMER(SECONDS)) that can be manipulated independently.
Depending on the format you associate to the Tag, they will appear in the text field with the following format:

They are actually a composition of several tags. In the case above:
- one for hours
- one for minutes
- one for seconds
By default, the tags are separated by colon (":"). You can replace the colons by any string you want directly in the text field:

For more information and capabilities about Countdowns. have a look at the Countdown component
Updated 6 months ago