

Use Purchasely with your data stack
How Purchasely data goes to your analytics, CDP, CRM and attribution tools, and how the data of these tools comes back into Purchasely to target your users
Overview
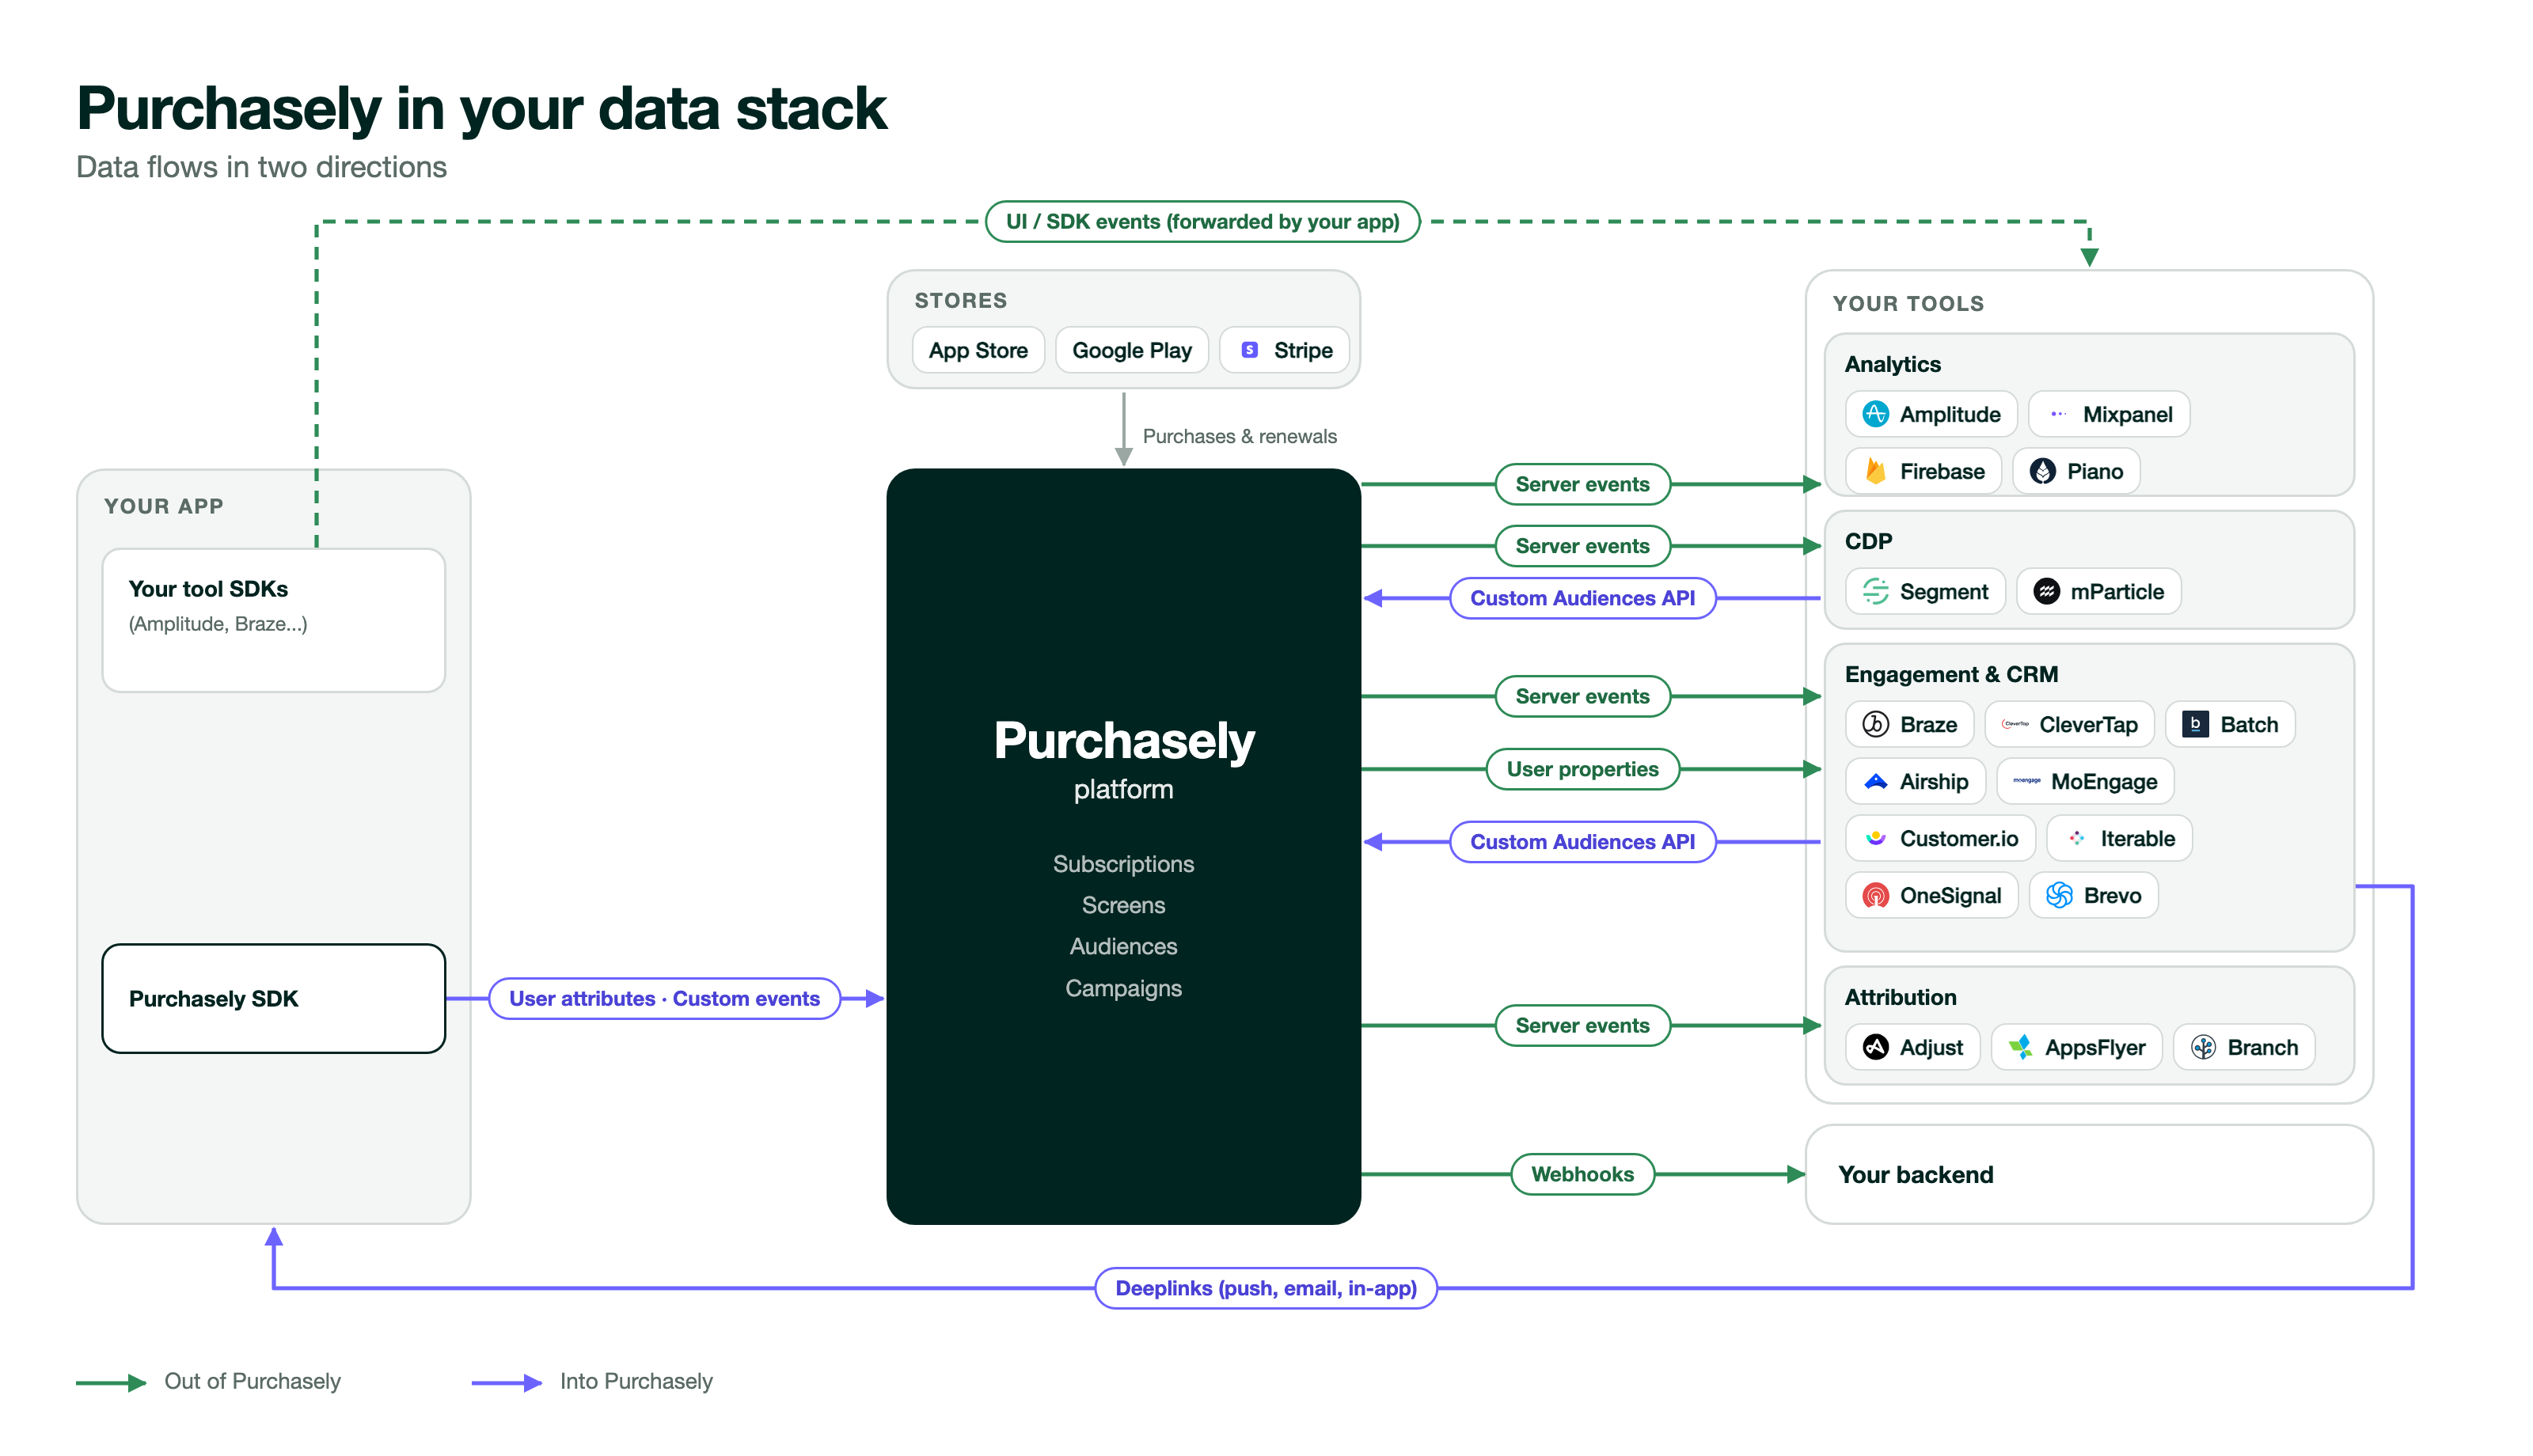
Purchasely exchanges data with your analytics, CDP, CRM and attribution tools in two directions:
- Out of Purchasely: subscription events, user properties and screen events go to your tools. Use them to analyze revenue and conversion, and to start CRM campaigns.
- Into Purchasely: user attributes, custom events and segments from your tools come into Purchasely. Use them to select which screen, offer or campaign each user sees.
Find the correct mechanism
| You want to... | Mechanism | Who does the work | Page |
|---|---|---|---|
| Analyze subscriptions and revenue in your analytics tool | Server Events | Console configuration, no app code | Server Events |
| Start a CRM campaign when a subscription changes (cancellation, billing issue...) | Server Events and User Properties | Console configuration, no app code | User Properties |
| Analyze screen views and paywall conversion in your analytics tool | UI / SDK Events | Your app (event listener) | UI / SDK Events |
| Receive subscription events in your own backend | Webhook | Your backend (HTTPS endpoint) | Webhooks |
| Target users with data that your app knows (profile, usage, preferences) | User attributes | Your app | User attributes |
| Show a screen or start a campaign when the user does something in the app | Custom events | Your app or a Screen button | Custom events |
| Target users with a segment built in your CDP or CRM | Custom Audiences API | Your CDP or CRM vendor, or your backend | Custom Audiences API |
| Open a Purchasely screen from a push notification, an email or an in-app message | Placement deeplink | Your CRM campaign and your app | Deeplinks |
Data out of Purchasely
Server Events
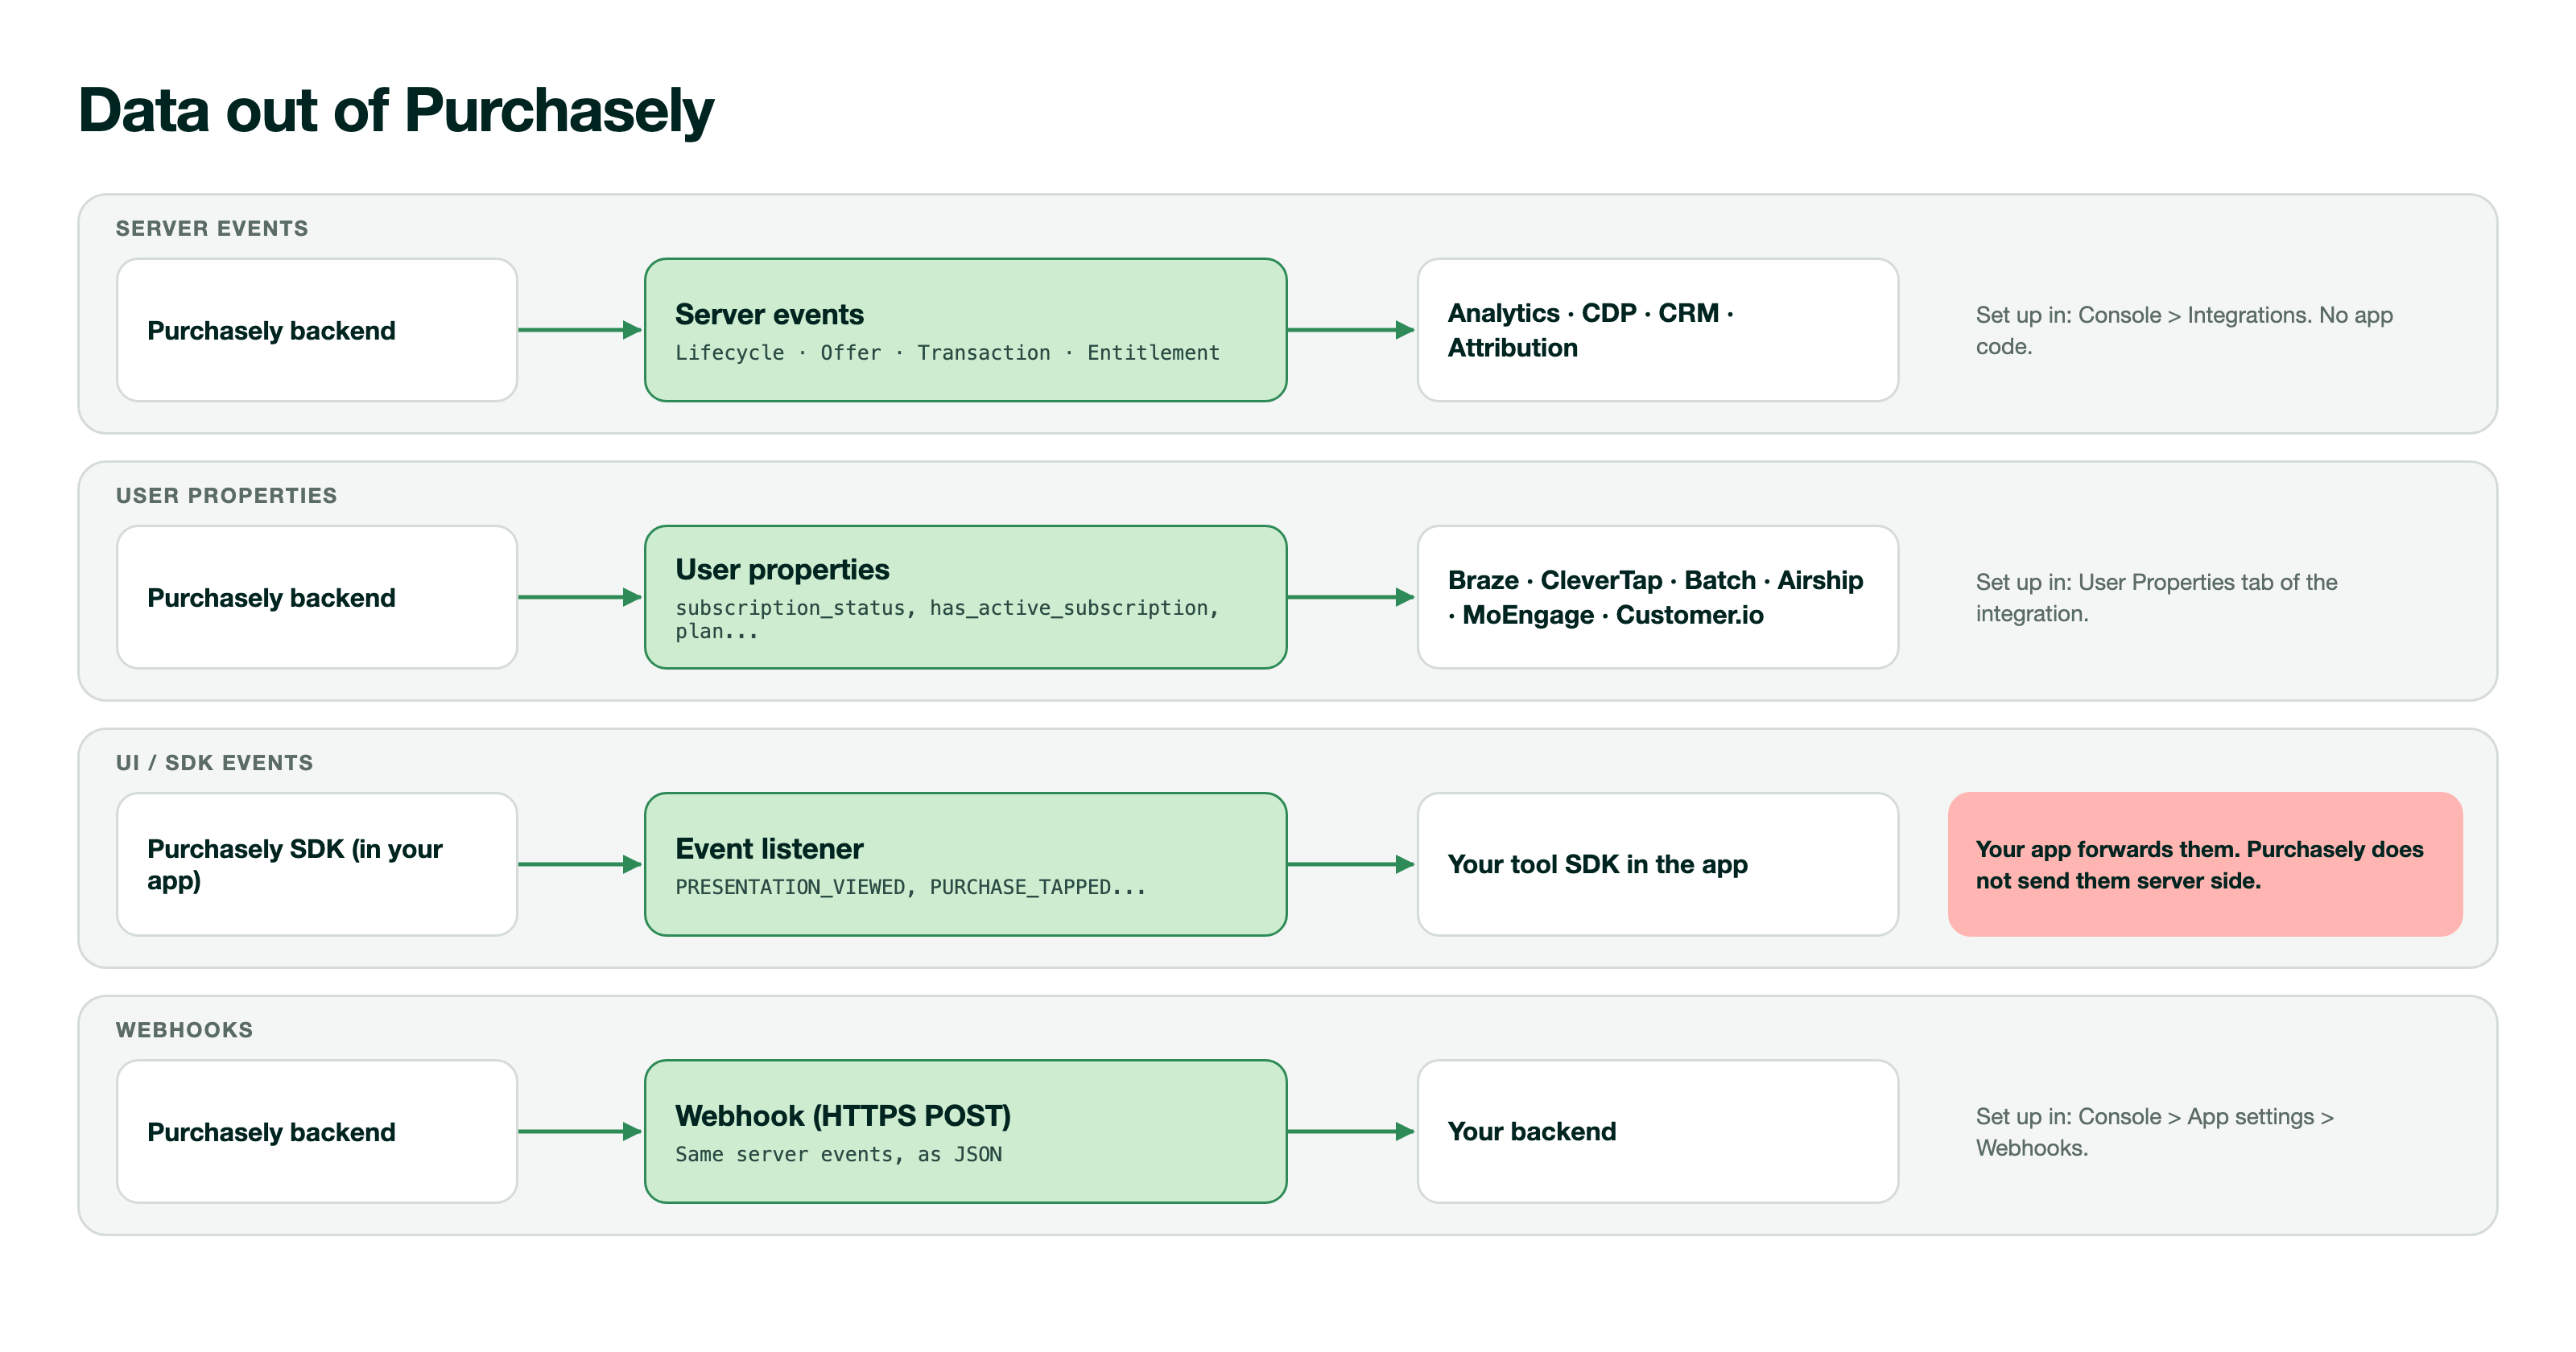
Server Events describe the subscription lifecycle: trial started, subscription renewed, renewal disabled, billing issue, refund, and more. The Purchasely backend generates them from the store notifications. Your app does not send them.
- Activate the integration in the Purchasely Console, in the Integrations section.
- Enable each event that you want to send in the Server events tab of the integration. You can also change the event name to match your naming plan.
- Purchasely sends the events server side, also when the app is closed. Renewals, cancellations and refunds also arrive when the user does not open the app.
- Each event carries its attributes: plan, product, store, price, offer type, placement, screen, A/B test, audience and more.
Server Events go to the Analytics, Engagement & CRM and Attribution integrations, to Segment, to mParticle and to your webhook.
User Properties
Some Engagement & CRM integrations also keep a set of properties up to date on the user profile in the tool. For example: subscription_status, has_active_subscription, plan, store, offer_type, subscription_started_at.
- Enable the properties in the User Properties tab of the integration. You can change the name of each property.
- Use the properties to build segments in your CRM. For example: "users whose subscription is in grace period".
- Refer to Engagement & CRM for the full list of properties.
The integrations that update user properties are: Braze, CleverTap, MoEngage, Batch, Airship and Customer.io. OneSignal receives the subscription data as tags. Brevo receives the properties with each event. Refer to the capability matrix.
UI / SDK Events
UI / SDK Events describe what the user does on a Purchasely screen: screen viewed, plan selected, purchase tapped, screen closed, and more. Refer to the list of events.
Your app forwards the UI / SDK EventsPurchasely does not send UI / SDK Events to the integrations or to the webhook. To see them in your analytics tool, listen to the events in your app and send them with the SDK of your tool.
UI / SDK Events are gathered by the Purchasely Platform but they cannot be routed from the Purchasely Console to the webhook or to 3rd party integrations.
If you wish to track these events in your own Analytics or in a 3rd party analytics tool, you need to set yourself an event delegate / event listener inside the app.
Listening to events
Purchasely.setEventDelegate(self)Purchasely.eventListener = eventListener// Nothing special to setup, just go to "Receiving events" below// Nothing special to setup, just go to "Receiving events" below// Nothing special to setup, just go to "Receiving events" belowThis code must be inserted after starting the SDK.
Receiving events
You will receive the events like this :
	func eventTriggered(_ event: PLYEvent, properties: [String : Any]?) {
		switch event {
		case .linkOpened:
			print("Link opened")
		default:
			print("Ignored")
		}
	}
private val eventListener = object : io.purchasely.ext.EventListener {
override fun onEvent(event: PLYEvent) {
when (event) {
PLYEvent.LoginTapped -> Log.d("Purchasely", "Login tapped, we should open login page")
}
}
}Purchasely.addEventListener((event) => {
console.log('Event Name ' + event.name);
console.log(event.properties);
console.log(event);
});
//When you do not want to listen to events anymore
Purchasely.removeEventListener();Purchasely.listenToEvents((event) =>
print(event.name)
);Purchasely.addEventsListener((event) => {
console.log("Event Name " + event.name);
console.log(event.properties);
console.log(event);
});Once received, these events can be directly forwarded to your internal Analytics or 3rd-party Analytics SDK inside your app.
Webhooks
The webhook sends the same Server Events to your own backend, as JSON, with an HTTPS POST.
- Set the URL in the Console, in the settings of your app.
- Use the webhook to update the entitlements in your backend, to fill your data warehouse, or to send the events to a tool that has no Purchasely integration.
Match the data to your users
A tool can join a Purchasely event to a user profile only if both use the same user ID. Most integrations need the user ID of the tool. Your app gets this ID from the SDK of the tool and gives it to Purchasely with Purchasely.setAttribute.
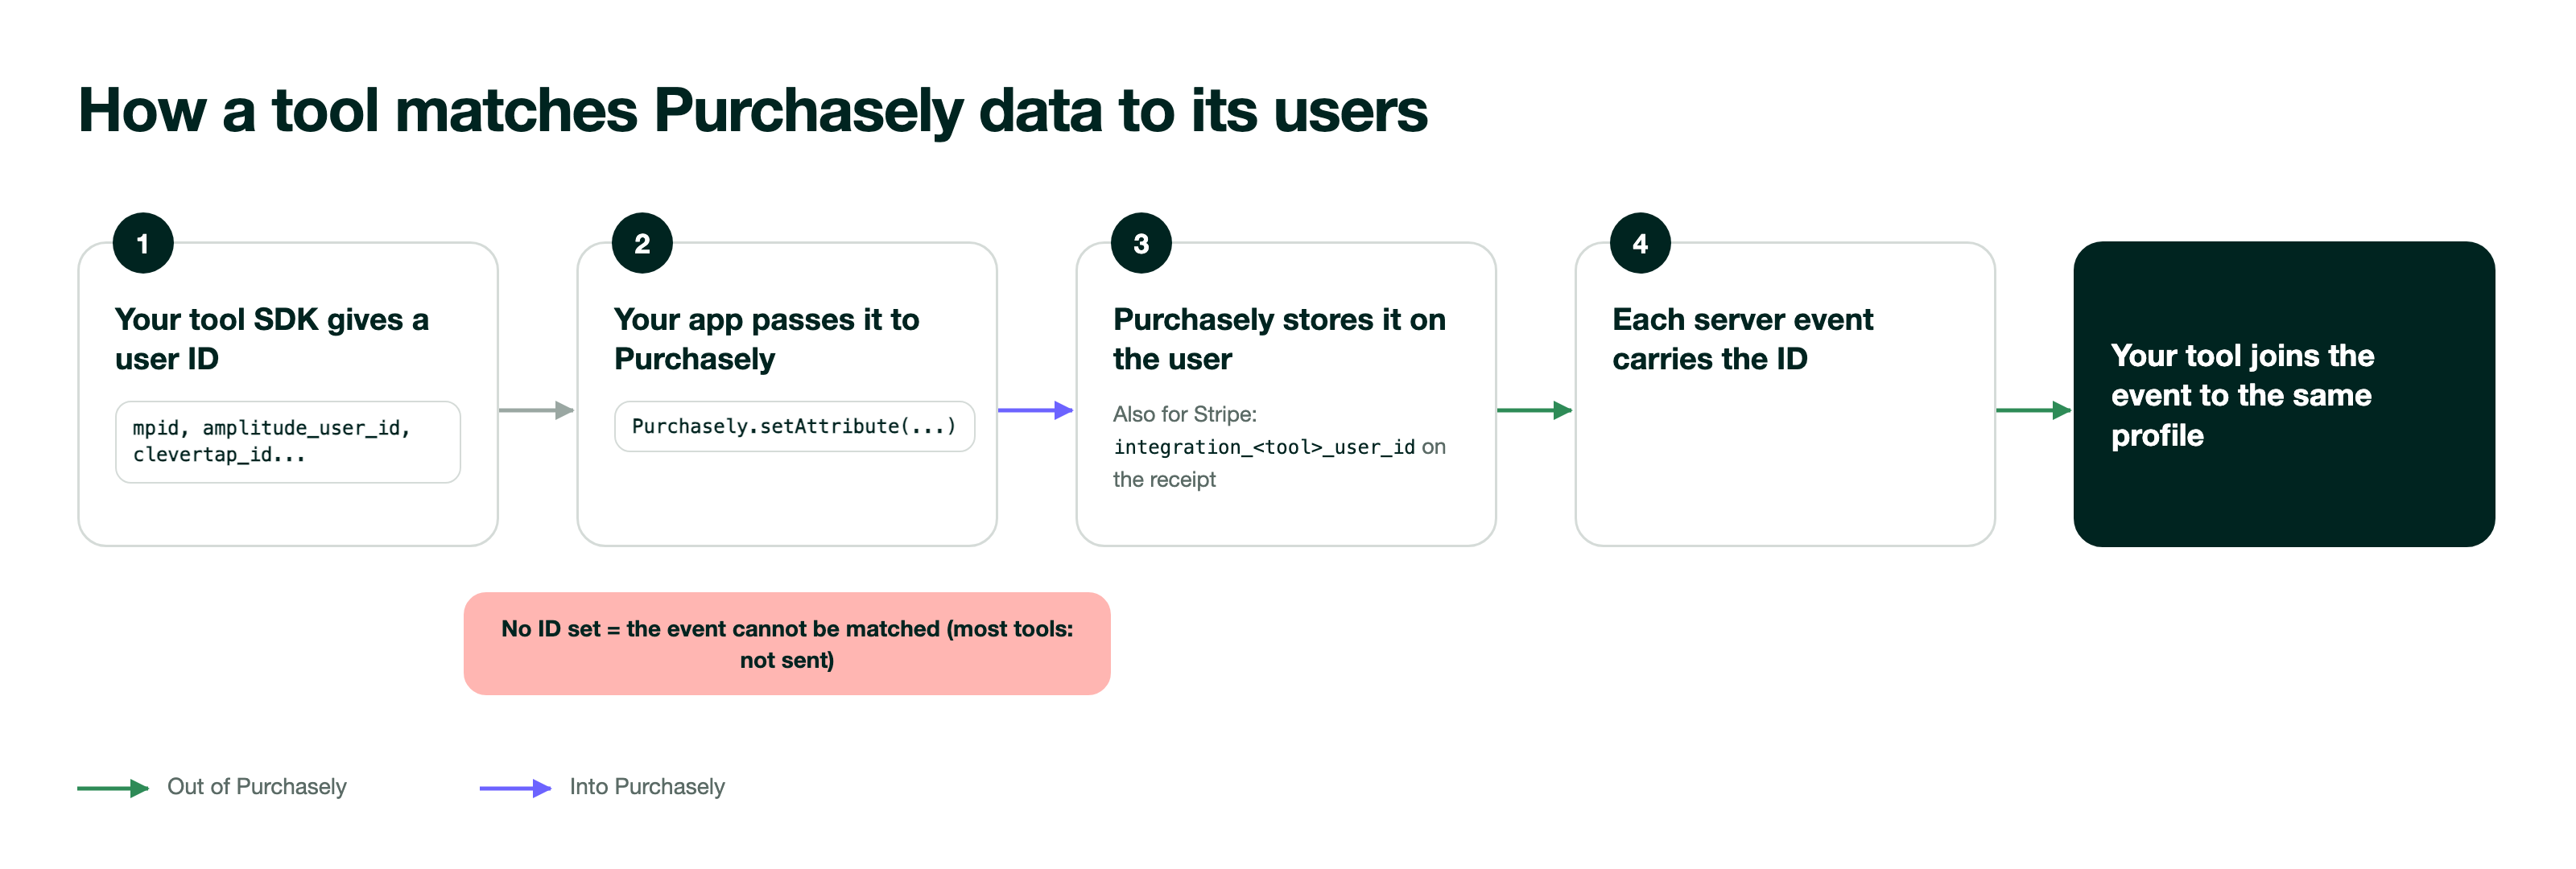
- Set the ID as early as possible, and again each time it changes (for example after a login).
- If the ID is not set, most integrations do not send the event, because the tool cannot match it.
- For Stripe purchases, there is no SDK in the loop. Send the ID in the
integration_..._user_idfields of the receipt. Refer to Stripe configuration.
The page of each integration gives the exact attribute and the code for each platform.
Capability matrix
| Integration | Server Events | User Properties | User ID that your app gives to Purchasely |
|---|---|---|---|
| Amplitude | ✅ | - | Amplitude user ID and device ID |
| Mixpanel | ✅ | - | Mixpanel distinct ID |
| Google Analytics for Firebase | ✅ | - | Firebase app instance ID |
| Piano Analytics | ✅ | - | Piano visitor ID |
| Segment | ✅ | - | None: Segment receives your user ID and the Purchasely anonymous ID |
| mParticle | ✅ | - | mParticle ID (MPID) |
| Braze | ✅ | ✅ | None: Braze receives your user ID, or the purchasely_anonymous_id alias that your app sets in Braze |
| CleverTap | ✅ | ✅ | CleverTap ID |
| MoEngage | ✅ | ✅ | MoEngage unique ID |
| Batch | ✅ | ✅ | Batch custom user ID |
| Airship | ✅ | ✅ | Airship named user ID or channel ID |
| Customer.io | ✅ | ✅ | Customer.io user ID |
| Iterable | ✅ | - | Iterable user ID or email |
| OneSignal | Tags only | ✅ (tags) | OneSignal user ID or external ID |
| Brevo | ✅ | With each event | Brevo user email |
| Adjust | ✅ | - | Adjust ID (adid) |
| AppsFlyer | ✅ | - | AppsFlyer ID |
| Branch | ✅ | - | Branch developer identity |
| Slack | Notifications for a set of events | - | None |
| Webhook | ✅ | - | None: the events carry your user ID and the anonymous ID |
UI / SDK Events are not in this matrix: your app forwards them to all tools. Refer to UI / SDK Events.
Data into Purchasely
User attributes
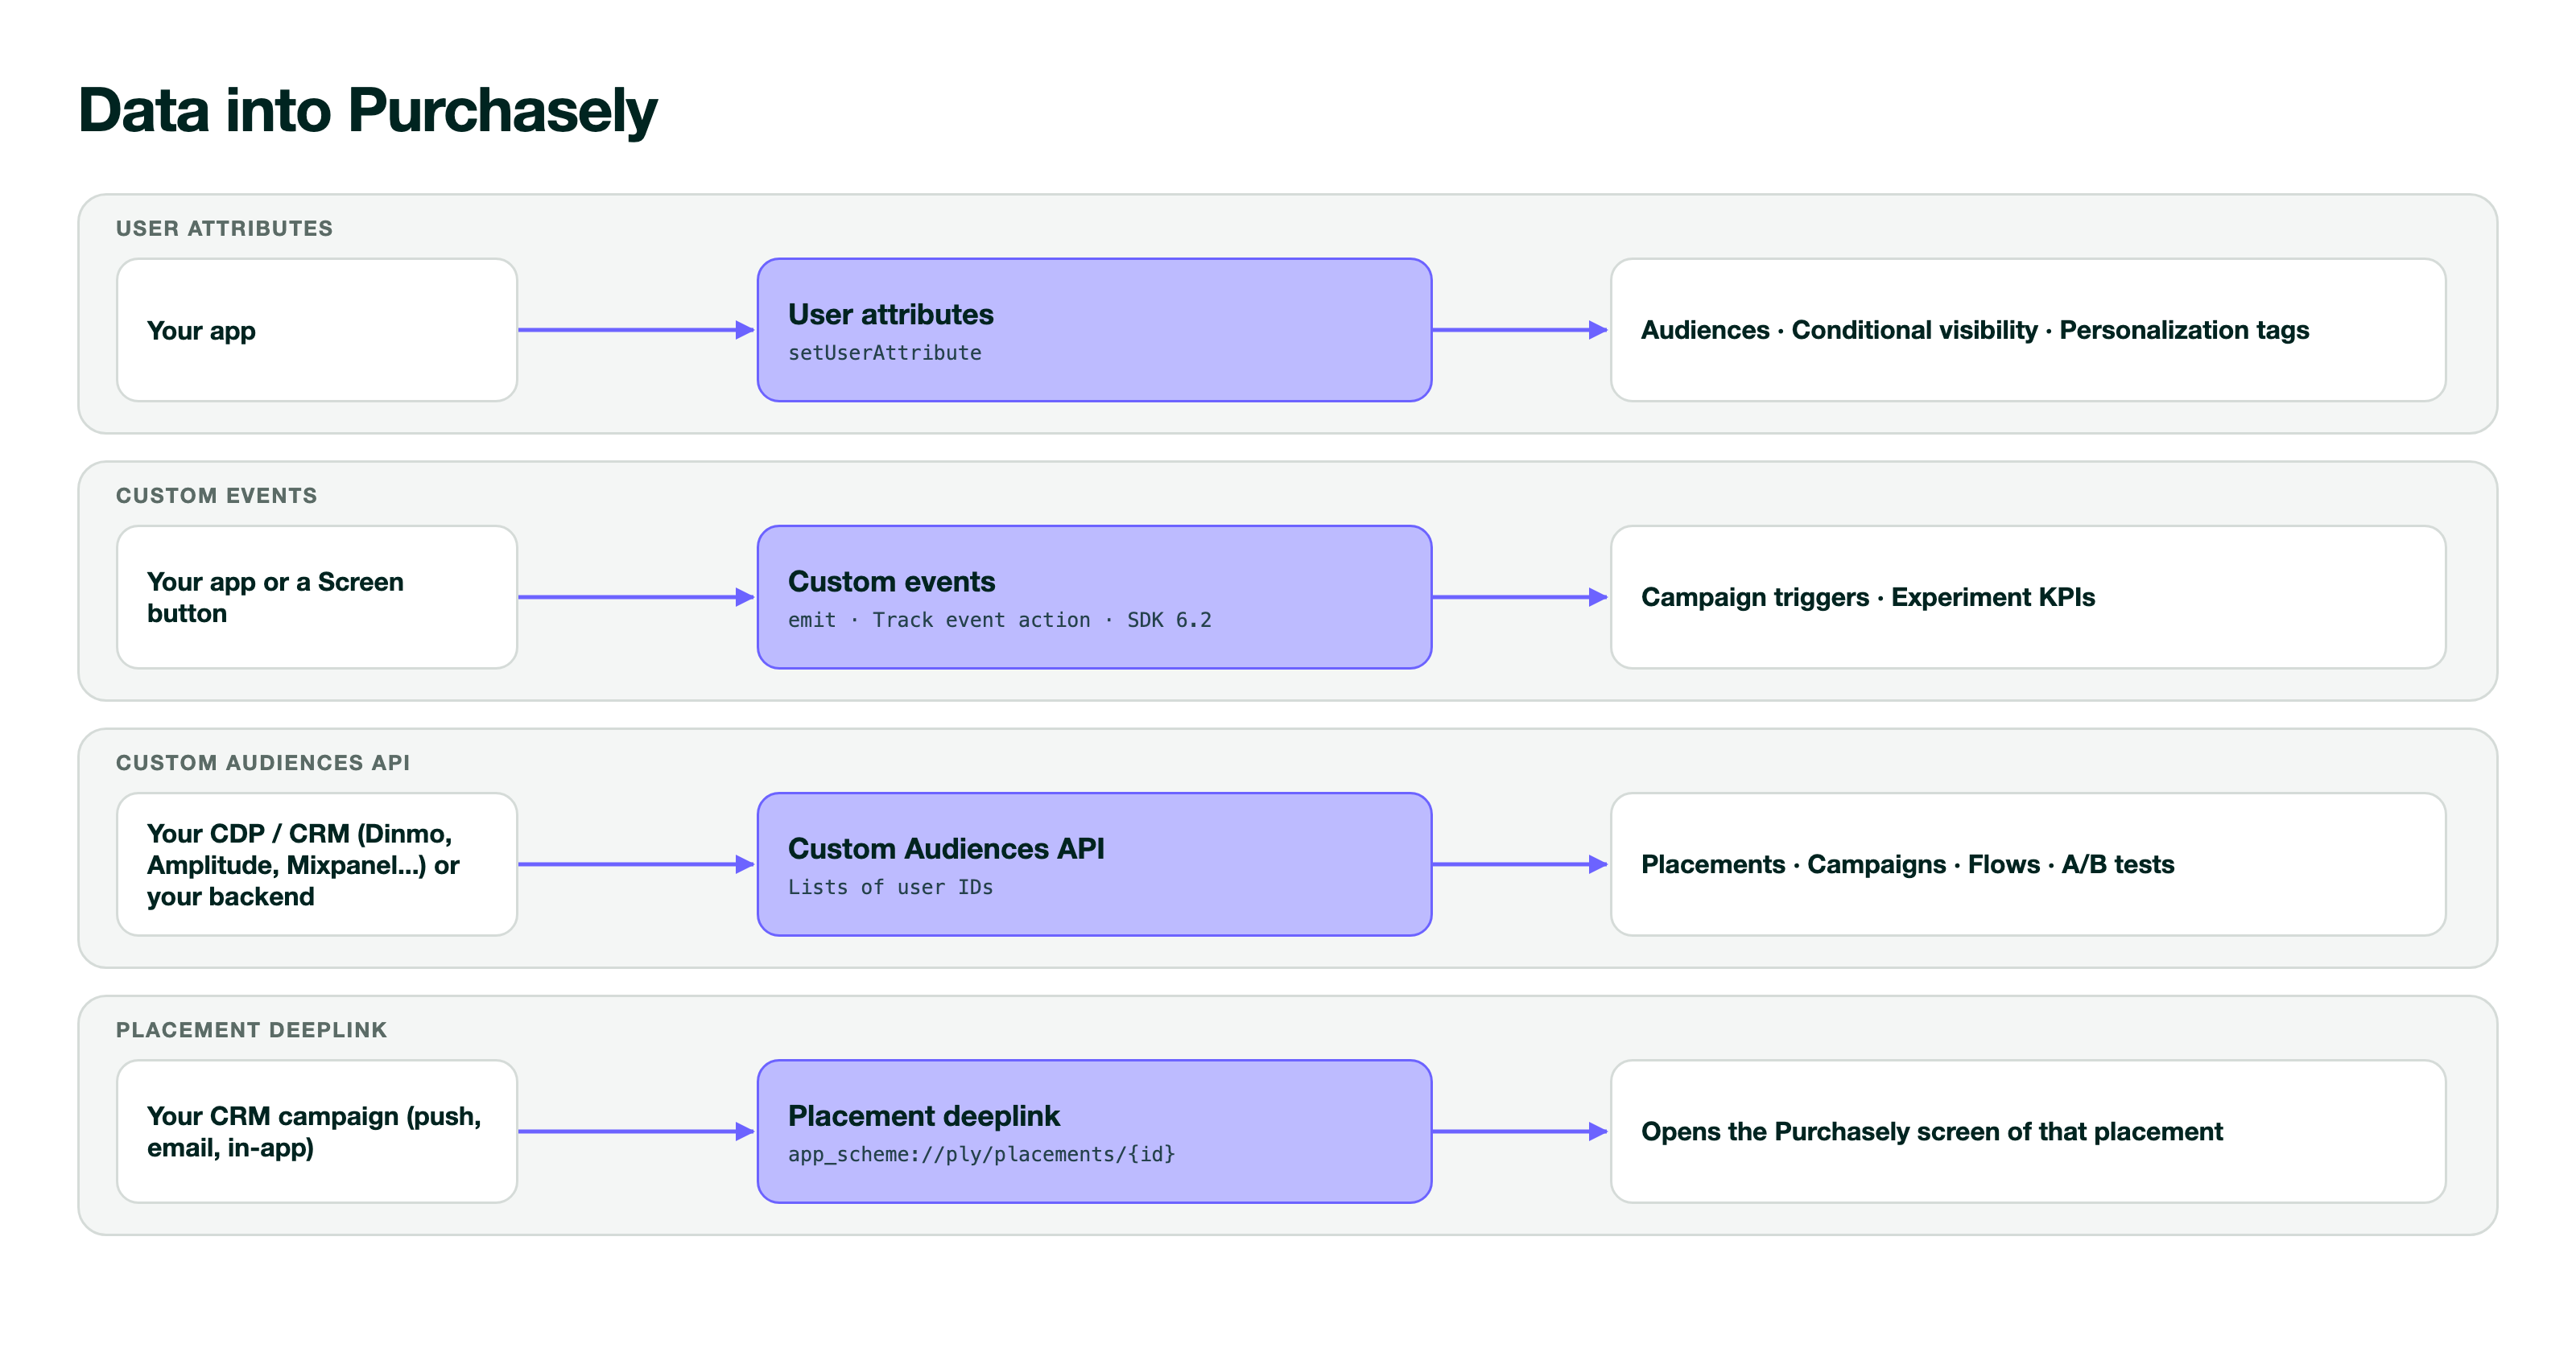
Custom user attributes are values that your app sets on the user: subscription intent, favorite sport, number of articles read, loyalty level, and more.
- Declare each attribute in the Console, with its type: string, array of strings, int, float, bool or date.
- Set the value in your app with the
setUserAttributemethods of the SDK. - Use the attributes in audiences, in the conditional visibility of a screen component, and in personalization tags such as
{{ user.firstname }}.
To use a value that comes from another tool, read it in your app with the SDK of that tool, then set it as a user attribute.
Custom events
Custom events (SDK 6.2.0 and later) tell Purchasely that the user did something in the app. For example: ARTICLE_READ or WORKOUT_COMPLETED.
- Declare the event and its properties in the Console. Purchasely drops an event that you did not declare.
- Send the event with
Purchasely.emit, or with the Track event action of a Screen button. - Use the event to trigger a campaign, with filters on its properties, and as the main KPI of an experiment.
Custom Audiences API
The Custom Audiences API receives lists of users from your CDP, your CRM or your backend. Each list becomes a custom audience in Purchasely.
- Use a custom audience like an audience: in Placements, Campaigns, Flows and A/B tests.
- The integration is available in Dinmo, Amplitude and Mixpanel. For another tool, your vendor or your backend calls the API.
- The feature must be enabled on your account. Refer to the prerequisites in Custom Audiences API.
- After an update, the app gets the new list in a maximum of 15 minutes.
Deeplinks
A CRM campaign can open a Purchasely screen with a placement deeplink, for example app_scheme://ply/placements/PLACEMENT_ID.
- Copy the deeplink of the placement in the Console and put it in the push notification, the email or the in-app message.
- The placement shows the screen that matches the audience of the user. You can change the screen in the Console without a change to the campaign.
- Your app must give the deeplinks to the Purchasely SDK. Refer to Deeplinks management.
Refer to Deeplink automations for complete examples.
Recipes
Win back users who disabled the renewal
- In the Braze integration (or another Engagement & CRM integration), enable the
RENEWAL_DISABLEDServer Event. - In Purchasely, create a placement
winbackand attach a screen with a retention offer. - In Braze, create a campaign that starts on
RENEWAL_DISABLED. Put the deeplink of thewinbackplacement in the push notification. - The user taps the notification. The app opens the retention screen.
The Server Events attributes tell you the plan and the store of the user. Use them to send a different message to each segment.
Measure the full funnel in your analytics tool
- In your app, give the user ID of your analytics tool to Purchasely. Refer to Match the data to your users.
- In the app, forward the UI / SDK Events (for example
PRESENTATION_VIEWEDandPURCHASE_TAPPED) to the SDK of your analytics tool. - In the Console, activate the integration and enable the Server Events (for example
TRIAL_STARTEDandTRIAL_CONVERTED). - In your analytics tool, build the funnel: screen viewed, purchase tapped, trial started, trial converted. All the steps are on the same user.
Target users with data from two tools
Example: a user signed up to the newsletter (an event in mParticle) and installed the app from a specific campaign (an event in Adjust). You want to show a dedicated screen to these users.
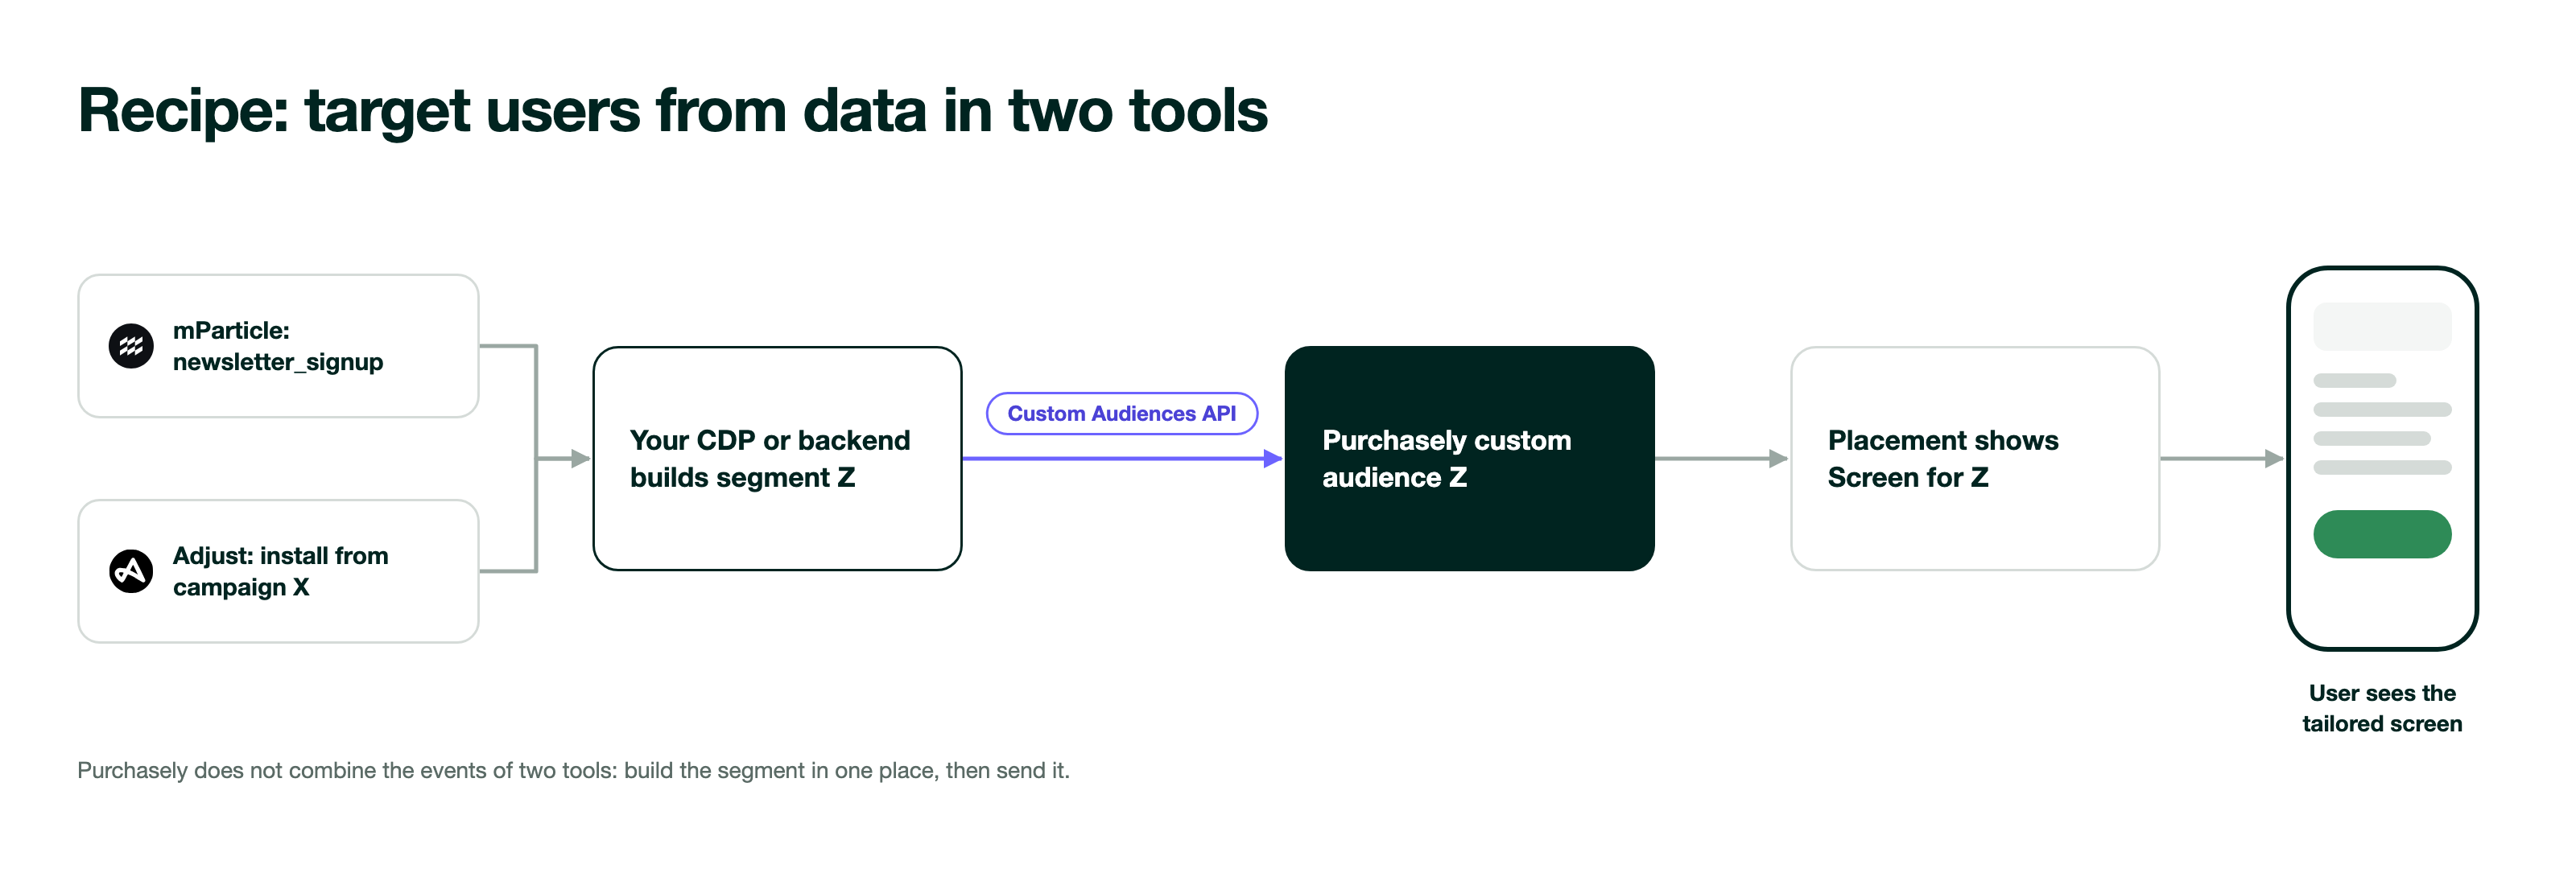
- Build the segment in the tool that has the two data sources: your CDP, your CRM or your data warehouse.
- Send the segment to Purchasely with the Custom Audiences API, from your vendor or from your backend.
- In Purchasely, attach the dedicated screen to the custom audience on the placement.
Purchasely does not combine the events of two toolsPurchasely does not join the events that your tools collect. The segment must be built in one place, and then sent to Purchasely.
If the data is already in your app, you can also set it as a user attribute and build a Purchasely audience with it.
Privacy
The thirdPartyIntegrations purpose of the SDK stops the forwarding of the Server Events of the user to the third-party integrations. Refer to Privacy settings for all the purposes, and for the effect of each purpose on analytics, personalization and campaigns.
Updated about 2 hours ago